This topic contains 0 replies, has 1 voice, and was last updated by ![]() Christian 12 years ago.
Christian 12 years ago.
-
AuthorPosts
-
July 2, 2014 at 9:23 am #202
IMPORTANT NOTES:
Installing the Zaquencer firmware will void the warranty from the original
manufacturer for the device, please make note of that before you proceed.
Installing the Zaquencer firmware on your BCR will erase everything that´s on it. So if you
have made elaborate mappings for your BCR, make sure to export them and save them on a
computer before proceeding!!!
Interchanging the Zaquencer firmware with the original BCR one is possible without
problems (except for losing the Flash Presets in both directions).DO NOT DISCONNECT POWER WHEN WRITING TO FLASH!!!
3.1. Upload
Uploading of the Zaquencer firmware works exactly like uploading an official firmware update.ZAQ Audio recommends you to get a firm grasp on uploading BCR firmware by using
the original BCR Firmware first. Check that everything works fine with your MIDI
Interface and the connections, before voiding your warranty in uploading the
Zaquencer firmware.You need a software capable of sending MIDI Sysex Messages (like MIDIOx on PC or SysEx
Librarian on Mac OS).
Also, you need a MIDI Interface with DIN connectors. USB will NOT work for uploading the
firmware.
Connect the output of your MIDI Interface to the MIDI Input of the BCR.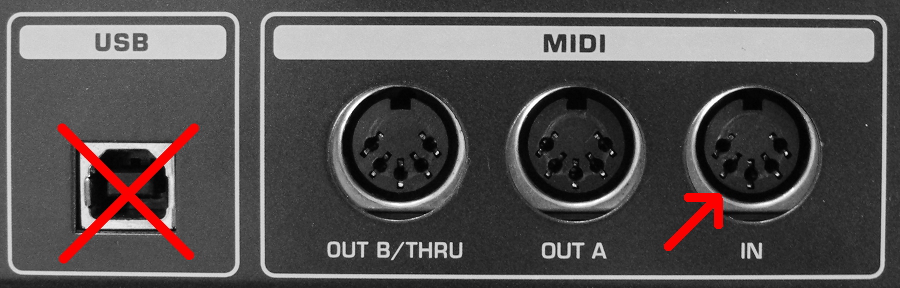
To put the BCR in update (=bootloader) mode, hold the buttons STORE and LOAD on startup.
The display should show „LOAd“, and the held buttons should light up.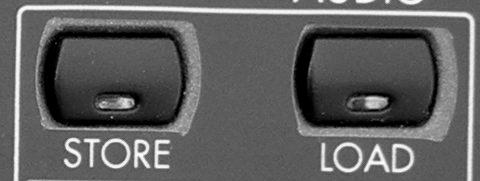

Now you can send the sysex file to the BCR via MIDI connection and above mentioned
programs.MIDIOX:
Make sure that the Sysex output buffer has at least a size of 305 bytes. The timing should be
set to 150ms delay between buffers and after F7.SysEx Librarian:
The timing should be set to 150ms delay between buffers.
Choose a slower transmission speed (starting with 50%).When the firmware is transferring, you should see a number counting up in the BCR display. If
you don´t see the number, check the Sysex output buffer size, the MIDI connection, correct
MIDI Output of the PC. If all checks correctly, try restarting the BCR (in update mode – see
above) and/or the computers MIDI interface. Also there has been varying success with
different MIDI Interfaces, so it´s also a good idea to try other interfaces if not successful.
As a general rule: the more expensive the MIDI Interface, the better the chance of success.When transmitting firmware through the BCR Bootloader, watch out that it doesn´t show an
„F“ on the leftmost LCD digit. When that happens, the block of SysEx messages was
transferred incorrectly and you need to retransmit the whole firmware. You can also check this
through the answer messages that the BCR outputs after receiving a SysEx Block (you need to
connect a MIDI Monitor software to the BCRs MIDI Out while transferring the firmware):- Block Error: F0 00 20 32 7F 15 35 XX XX 01 F7
- Block OK: F0 00 20 32 7F 15 35 XX XX 00 F7After the firmware has transferred correctly (the numbers and update bar stop moving),
restart the BCR.DO NOT DISCONNECT POWER WHEN WRITING TO FLASH!!!
-
AuthorPosts
The topic ‘STICKY: Installation’ is closed to new replies.